Tor Network
Tor, or "The Onion Router," is an overlay network (meaning it's a network built on top of another network, which in this case is the internet). The Tor Network isn't meant to be a censorship circumvention tool, but its design allows it to be used to bypass censorship as well. The main usage of this network is to enable its users to communicate anonymously within the network through layered routing and encryption. 1
Tor works by routing traffic through a series of volunteer nodes. This series of nodes is called a circuit in the Tor network. In a circuit, your data is encrypted to a random node called the entry node, then your data is encrypted to another random node called the middle node, and finally, your data is passed to a random node called the exit node. The encrypted data is peeled to reveal its content and destination, but because of this routing, the source of the traffic is unknown. 2
How it works to bypass censorship
Because of the Tor network's layered routing and exit nodes (which route the Tor network's traffic to the clearnet), Tor can act as a 3-layered VPN, meaning you will send your data to an entry node, and the data will be sent to the clearnet by an exit node that is very likely to have free access to the internet.
The problem is that the Tor network's traffic is detectable by firewalls and can be censored. Also, the entry nodes are known and can be censored using IP filtering or DNS Spoofing techniques. Because of this problem, Tor features some circumvention tools to bypass blocked access to the Tor network.
These circumvention tools are called "pluggable transports" or "bridges." They cannot usually be used directly to obfuscate normal traffic, and they must be used along with the Tor network (they can be used to obfuscate other traffic by some tweaks and modifications). 3
| Pluggable Transport | Description |
|---|---|
| Obfs3 | Obfs3 is a pluggable transport meant to make traffic look random and not like any other protocol. Although Obfs3 is not supported anymore, it can be used to obfuscate other traffic such as SSH traffic or VPN traffic. |
| Obfs4 | It also makes Tor traffic look random while also preventing Obfs4 bridges from being found and censored through internet scanning, so they are less likely to be censored compared to Obfs3 bridges. |
| meek | Meek transports make traffic look like you are browsing a major website. For example, meek-azure makes it look like you're using Microsoft services instead of Tor. |
| Snowflake | Snowflake works by routing your traffic through volunteer-operated WebRTC proxies to make it look like you are on a video call instead of Tor. |
| WebTunnel | WebTunnel makes your Tor traffic look like HTTPS website traffic. |
Privacy and Security Measures
Tor network's communications are encrypted and secure, meaning your ISP (Internet Service Provider) cannot decrypt the content of the messages and data passing through. But they can detect that you are using Tor if it is not used with a pluggable transport such as Obfs4 or Snowflake, due to a few reasons:
- Traffic analysis can be used to detect and block Tor connections based on unique characteristics of Tor network's packets, such as packet sizes (Tor has a fixed length for its cell sizes), timing, and encrypted patterns.
- Deep Packet Inspection (DPI) can be used to inspect the fully encrypted data and find specific patterns associated with Tor network's communications.
- Tor has a public list of its entry nodes and exit nodes, which can be easily blocked by firewalls.
Also, if the Tor network is used to access the clearnet, meaning the destination of requests is not inside the Tor network (for example, duckduckgo.com is a clearnet, or normal internet website, and duckduckgogg42xjoc72x3sjasowoarfbgcmvfimaftt6twagswzczad.onion is a Tor network website), the exit node will be able to see the data that it is passing to the destination. But this is less of a problem now that most websites use HTTPS for encryption, leaving only some small metadata for exit nodes to see. And also, when they see the data, they cannot know where it came from.
Implementations
There are two official core implementations of Tor: one is the Tor implemented in the C programming language, and the other is Arti4 implemented in Rust. The Rust implementation is not fully ready yet, and it is suggested to use the C implementation for actual privacy reasons.
Also, there are clients built based on these core implementations for different operating systems:
| Implementation | Description | Windows | Linux | Android | iOS | macOS |
|---|---|---|---|---|---|---|
| C Tor | Core implementation of Tor, which can be used to run volunteer nodes, a server, or a client. | Yes | Yes | Yes | No | Yes |
| Arti | Rust version of the C Tor implementation, not ready to use yet. | Yes | Yes | Yes | No | Yes |
| Tor Browser (or "Onion Browser") | A hardened browser with fingerprint-resisting features and Tor network built-in. | Yes | Yes | Yes | Yes | Yes |
| Orbot | A free and open-source front-end for Tor, allowing the use of Tor as a VPN or a proxy. | No | No | Yes | Yes | No |
How to Use and Set Up
Tor Network can be used in several ways, including as a client, in which you will only be using the Tor network to communicate anonymously, as a server, in which you will run an onion address that other Tor network users can connect to and communicate with anonymously, and you can run volunteer nodes, in which you will be passing the network's data to other nodes and helping the network become faster, more secure, and more stable.
This guide covers the client side and ways to retrieve Tor bridges (or pluggable transports), because that is what you need in order to bypass censorship.
Getting Pluggable Transports
Public Tor bridges are available on BridgeDB, a website run by the Tor team to provide users with free pluggable transports. These pluggable transports are mainly run by volunteers.
To obtain some bridges, you can go to https://bridges.torproject.org, select the type of pluggable transport you need, and BridgeDB will provide you with a few bridges of that type.
But the problem is that the BridgeDB website is likely to be censored as well. To address this issue, the Tor team has come up with alternative ways to get bridges from BridgeDB, one of which is through email.
To get bridges via email, you need to send an email with an empty subject and a message body of get transport obfs4 to bridges@torproject.org. Note that your email provider should be either Riseup or Gmail; otherwise, you won't receive any bridges.
Another way to get bridges is through their Telegram bot. The Tor team has recently launched a Telegram bot that gives users fresh bridges every time they start it. The bot is available at @GetBridgesBot on Telegram.

C Tor
To connect to the Tor network using C Tor, you will need to download and install it first along with the obfs4proxy client to obfuscate the traffic and bypass the restrictions on Tor network communications.
Linux
In most Linux distributions, it will probably be available in the package managers under the name of the tor package. But if it doesn't exist in your repo, you may find a guide on building and installing it from the source code on Tor's community documents: https://community.torproject.org/onion-services/setup/install/.
| Linux Distribution | Command |
|---|---|
| Ubuntu / Debian | sudo apt-get install tor |
| Fedora | Tor's Official Guide |
| Arch Linux 5 | sudo pacman -S tor |
| openSUSE | sudo zypper install tor |
| Alpine Linux | sudo apk add tor |
| Gentoo 6 | sudo emerge --ask net-vpn/tor |
After installing Tor, you need to install obfs4proxy in order to make Tor capable of using obfs4 bridges.
Obfs4proxy might not be available in all package managers under the same name, or at all:
| Linux Distribution | Command |
|---|---|
| Ubuntu / Debian | sudo apt-get install obfs4proxy |
| Arch Linux | yay -S obfs4proxy |
If you can't find the obfs4proxy package for your distribution, you can compile and install it from its source:
-
Install dependencies:
goandgitpackages are needed. -
Clone the repository:
git clone https://gitlab.com/yawning/obfs4.git -
Switch directory to the cloned repository:
cd obfs4 -
Build and install from the source code:
go build -o obfs4proxy/obfs4proxy ./obfs4proxy
cp obfs4proxy /usr/bin/obfs4proxy
Now you can configure C Tor to use obfs4proxy as its pluggable transport:
-
C Tor's configuration file is usually located at
/etc/tor/torrc, and that is the file you want to edit. Open the file/etc/tor/torrcwith any editor you have, and make sure to open it with root permission to be able to write on it:# For example gedit editor: sudo gedit /etc/tor/torrc -
Go to the end of the file and add these lines. Make sure to replace the
Bridge <Bridge You Retrieved from BridgeDB>with the actual bridge you retrieved, for example:obfs4 141.95.106.58:19053 4283C0BA9294F931BE3B274C1DF6A7C1B67CD36A cert=TajDhn51Jd3NeF0azqY8oFYCeA/oha/UWod9pqiV9igDbwqfV1fO2uLC8Sa9Xa+3qZEcLA iat-mode=0:UseBridges 1 Bridge <Bridge You Retrieved from BridgeDB 1> Bridge <Bridge You Retrieved from BridgeDB 2> Bridge <Bridge You Retrieved from BridgeDB 3> ClientTransportPlugin obfs4 exec /usr/bin/obfs4proxy -
Start the Tor service:
systemctl start tor
After starting Tor, it will create a SOCKS5 and SOCKS4 proxy on the address 127.0.0.1 and port 9050 (by default), which can be set as proxies on the system, different apps, etc., to bypass censorship.
Windows
To use C Tor on Windows, it would be easier to use Tor's Expert Bundle 7, as it contains other pluggable transports like Snowflake and Lyrebird, along with the geoip files needed for Tor to operate.
You can download the Tor Expert Bundle package for Windows using the link below:
https://www.torproject.org/download/tor/
Then extract the downloaded ZIP file to a directory, for example: C:\Tor
For the obfs4proxy, since Windows doesn’t have package managers like Linux, you'll need to manually build obfs4proxy. For that, you'd need to install Go and Git first:
| Package | URL |
|---|---|
| Go for Windows | https://go.dev/dl/ |
| Git for Windows | https://git-scm.com/download/win |
After you install the Go and Git packages, you can build and install obfs4proxy using PowerShell:
git clone https://gitlab.com/yawning/obfs4.git
cd obfs4
go build -o obfs4proxy.exe ./obfs4proxy
move obfs4proxy.exe C:\Tor\obfs4proxy.exe
Now that you have everything ready, it's time to move on to configuring Tor:
-
The
torrcfile is located in the directory where you extracted the Tor Expert Bundle. Open it using any editor you like. -
Add the following lines at the end of the file, replacing
<Bridge You Retrieved from BridgeDB>with actual obfs4 bridges from Tor BridgeDB:UseBridges 1 Bridge <Bridge You Retrieved from BridgeDB 1> Bridge <Bridge You Retrieved from BridgeDB 2> Bridge <Bridge You Retrieved from BridgeDB 3> ClientTransportPlugin obfs4 exec C:\Tor\obfs4proxy.exe -
To start the Tor service, use PowerShell and navigate to the Tor directory:
cd C:\Tor -
Start the Tor process:
tor.exe -f "C:\Tor\Data\Tor\torrc"Once Tor is running, it will create a SOCKS5 proxy at
127.0.0.1:9050. You can configure your system or applications to use this proxy to route traffic through Tor.
macOS
The installation process for C Tor on macOS is quite similar to Linux; it should be installed using a package manager:
| Package Manager | Command |
|---|---|
| Homebrew | sudo brew install tor |
| MacPorts | sudo port install tor |
If you don't have the Homebrew package manager, install it using the command below:
/bin/bash -c "$(curl -fsSL https://raw.githubusercontent.com/Homebrew/install/HEAD/install.sh)"
The obfs4proxy package is also available in Homebrew, and you can install it using the command below:
brew install obfs4proxy
After you have both C Tor and obfs4proxy installed, you can configure the torrc file, which is typically located at /usr/local/etc/tor/torrc:
-
Open the file with root permission using any editor you like:
sudo nano /usr/local/etc/tor/torrc -
Add the following lines at the end of the file, replacing
<Bridge You Retrieved from BridgeDB>with your actual obfs4 bridges from BridgeDB. Then save the file and exit the editor.UseBridges 1 Bridge <Bridge You Retrieved from BridgeDB 1> Bridge <Bridge You Retrieved from BridgeDB 2> Bridge <Bridge You Retrieved from BridgeDB 3> ClientTransportPlugin obfs4 exec /usr/local/bin/obfs4proxy -
Restart the Tor service:
brew services start torAlternatively, you can start Tor manually by running the command
tor.
Once Tor is running, it will create a SOCKS5 and SOCKS4 proxy at 127.0.0.1:9050. You can configure your system or applications to use this proxy to bypass censorship.
Tor Browser
To install Tor Browser for your operating system, go to Tor's download page and download it for your OS:
https://www.torproject.org/download/
For Windows, macOS, and Android, it would be a .exe, .dmg, and .apk file, which can be installed easily. However, for Linux, it is a compressed .tar.xz file, which you need to extract and run the executable file inside.
After opening the Tor Browser, you will see a browser like this:
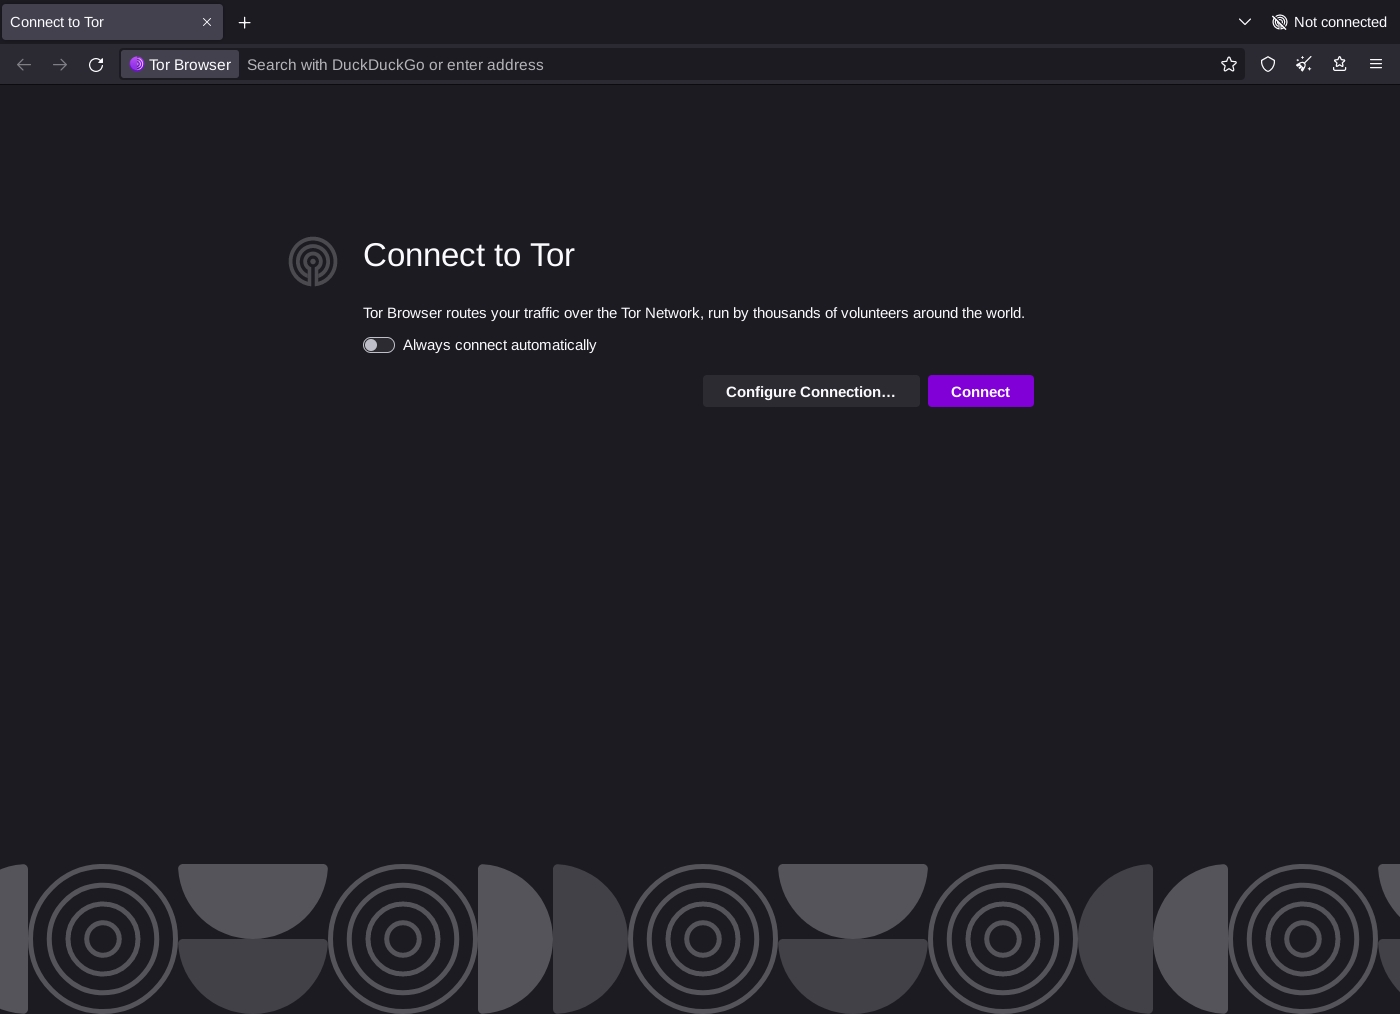
Here, you can click on the "Configure a Connection" button and add your bridges. Bridges can be added from the built-in bridges:

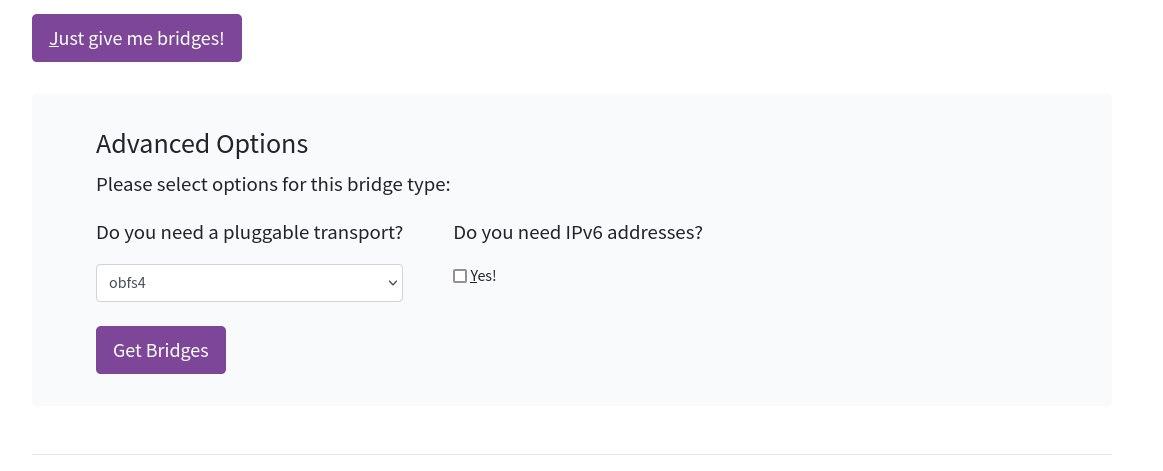
Or from custom bridges retrieved from BridgeDB:

When you have added your bridges, you can return to the start page and click on "Connect." After a successful connection, you can either use it as a censorship-free browser or use a SOCKS proxy outside the browser at 127.0.0.1:9150. Note that this SOCKS proxy is only available as long as your Tor Browser is open, running, and connected.
Orbot
Orbot is a project by the Guardian Project, fully open source and released under the BSD-3-Clause License, which is a free license. Orbot is a VPN and Proxy app that tunnels network traffic through the TOR Network.
To use Orbot, you first need to download and install it for your device architecture. Here is a list for downloading and installing on Android Devices:
| Source | Description | URL |
|---|---|---|
| Github Releases | Download the APK directly from Guardian Project's GitHub releases. | https://github.com/guardianproject/orbot/releases |
| Google Play | Install from Google Play. | https://play.google.com/store/apps/details?id=org.torproject.android&hl=en_US |
| F-Droid | Install from F-Droid (Recommended as it provides more privacy). | https://f-droid.org/packages/org.torproject.android |
Note: Be aware that to install Orbot from F-Droid, you will need to add the Guardian Project's repository to your F-Droid. For more information, check Guardian Project's guide.
Here is a list for installing Orbot on iOS Devices:
| Source | Description | URL |
|---|---|---|
| Github Releases | Download directly from Guardian Project's GitHub releases. | https://github.com/guardianproject/orbot-apple/releases |
| App Store | Install from the App Store. | https://apps.apple.com/us/app/orbot/id1609461599 |
After installing Orbot, the usage is fairly straightforward: you add your bridges if needed and tap "Connect."
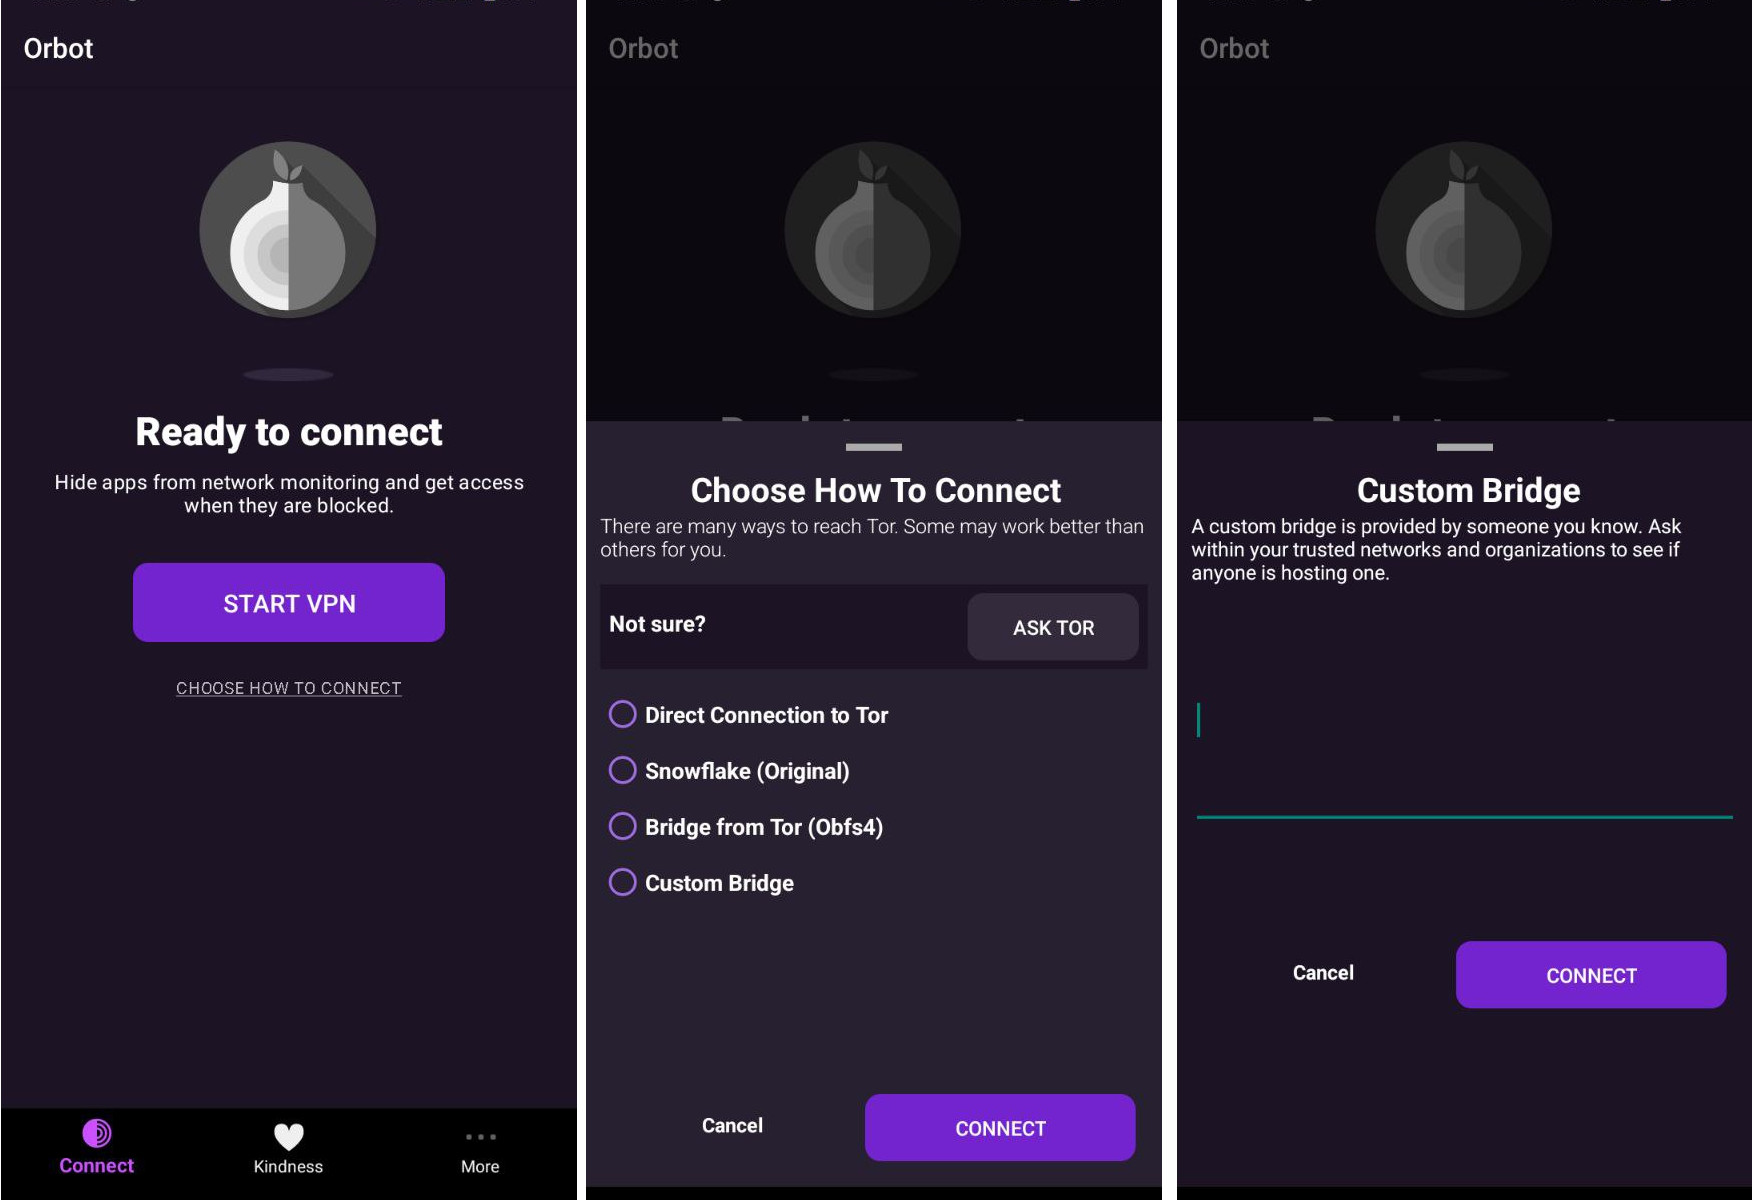
If you have created your own bridges and want to use those instead of public bridges, consider the option "Custom bridges" and paste the bridge lines there. Otherwise, the app will provide you bridges from BridgeDB if you use other options.
For more detailed information: https://spec.torproject.org/intro/index.html
How Tor path and circuit work: https://spec.torproject.org/path-spec/general-operation.html
Pluggable transports specifications: https://spec.torproject.org/pt-spec/index.html
Announcing Arti: https://blog.torproject.org/announcing-arti/
Archlinux Wiki on installing tor: https://wiki.archlinux.org/title/Tor
Gentoo Wiki on installing tor: https://wiki.gentoo.org/wiki/Tor
Tor's Expert Bundle: https://www.torproject.org/download/tor/